Table of Contents
ToggleA grimy house exterior doesn’t just look bad, it quietly damages siding, invites mold, and tanks property value. Home pressure washing transforms weathered vinyl, faded brick, and algae-streaked concrete in a single afternoon, making it one of the highest-impact maintenance tasks a homeowner can tackle. With the right equipment and technique, most homeowners can safely restore their home’s exterior without hiring a crew. This guide walks through everything needed to pressure wash a house properly: choosing equipment, avoiding costly mistakes, and deciding when to call in professionals.
Key Takeaways
- House pressure washing removes damaging mold, mildew, and algae while boosting curb appeal and home resale value by over $2,000 in many cases.
- A 2,000–2,500 PSI pressure washer with 2.0+ GPM is ideal for most residential homes, with electric models best for single-story properties and gas units suited for larger multi-story homes.
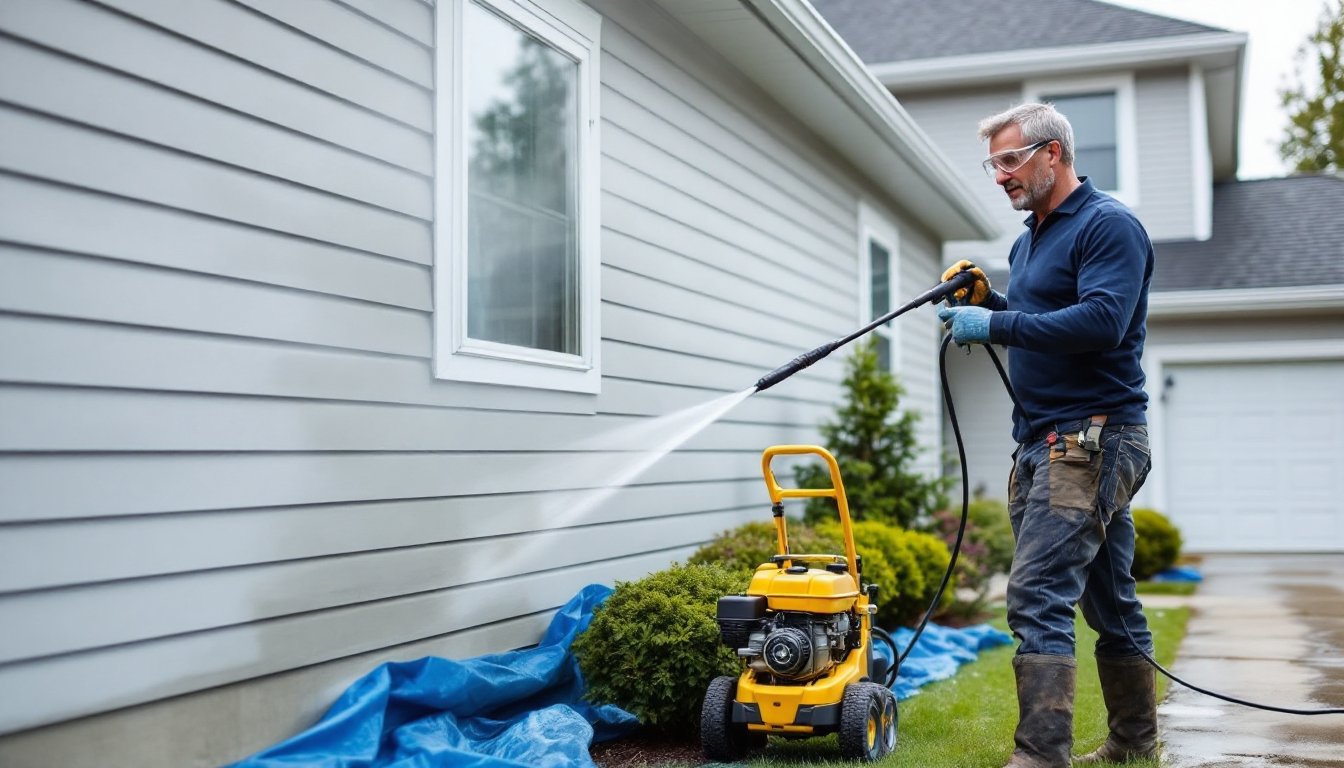
- Always rinse from top to bottom using a 25° nozzle held 12–18 inches away, angling downward to prevent water from forcing behind siding panels and causing interior moisture damage.
- Avoid common mistakes like using excessive pressure on vinyl siding, spraying upward, and cleaning in direct sunlight, which can cause permanent damage or leave streaky residue.
- DIY house pressure washing saves $200–$400 for single-story homes under 2,500 square feet, but professionals are worth hiring for two-story homes, delicate siding materials, or heavy biological growth.
What Is House Pressure Washing and Why Does It Matter?
House pressure washing uses a motorized pump to spray water at high velocity, typically between 1,300 and 3,000 PSI (pounds per square inch), to remove dirt, mildew, algae, and oxidation from exterior surfaces. Unlike garden hoses that rely on water volume alone, pressure washers use force to dislodge contaminants embedded in siding, trim, and masonry.
The process matters for three reasons. First, organic growth like algae and mold slowly degrades siding materials, particularly wood and composite products. Left unchecked, spores work into seams and fastener holes, accelerating rot. Second, oxidation and dirt buildup reduce reflectivity on lighter-colored homes, increasing cooling costs in summer. Third, curb appeal directly affects resale value, homes with clean exteriors consistently appraise higher than comparable properties with visible grime.
Low pressure house washing (also called soft washing) uses chemical detergents and reduced PSI to clean delicate surfaces like painted wood, stucco, and EIFS (exterior insulation and finish systems). This method prevents surface damage while still removing biological growth. Homeowners with vinyl or aluminum siding typically use moderate pressure, while brick and concrete can handle higher settings.
Benefits of Pressure Washing Your Home’s Exterior
Exterior house pressure washing delivers measurable returns beyond aesthetics. Most homeowners see these benefits:
Prevents costly repairs. Removing mold and mildew before they penetrate siding or soffit vents can save thousands in replacement costs. Wood siding in particular suffers accelerated decay when moisture-trapping growth goes unchecked.
Increases paint longevity. Dirt and biological growth prevent paint from adhering properly during repainting projects. Pressure washing before priming ensures a clean substrate, extending the life of new coats by 30-50% compared to painting over dirty surfaces.
Boosts energy efficiency. Clean, reflective siding reduces solar heat gain, particularly on south- and west-facing walls. This translates to lower air conditioning loads during peak summer months.
Improves health outcomes. Mold spores from exterior growth can infiltrate homes through window seals and attic vents, aggravating respiratory conditions. Regular cleaning reduces outdoor spore counts near living spaces.
Enhances property value. Real estate appraisers often note exterior condition in their reports. Professional pressure washing costs homeowners between $200 and $400 for a full house, while the perceived value boost often exceeds $2,000 in purchase negotiations.
Most homes benefit from annual pressure washing, though properties in humid climates or heavily shaded lots may require cleaning twice per year.
Choosing the Right Pressure Washer for Your Home
Residential pressure washers range from 1,300 to 3,200 PSI, with corresponding flow rates between 1.2 and 2.5 GPM (gallons per minute). The combination of PSI and GPM determines cleaning power, higher numbers mean faster work but also greater risk of surface damage.
For typical home pressure washing tasks, a 2,000–2,500 PSI unit with 2.0+ GPM handles vinyl siding, wood decks, and concrete driveways without issue. Units below 1,800 PSI struggle with embedded grime and require multiple passes. Machines above 3,000 PSI belong on commercial jobsites and will easily damage residential siding if used incorrectly.
Electric vs. Gas Pressure Washers
Electric models (typically 1,300–2,000 PSI) run quieter, weigh less, and require minimal maintenance. They’re ideal for single-story homes with accessible outdoor outlets. Most electric units draw 13–15 amps, so verify the circuit can handle the load, tripping breakers mid-job is common with underpowered circuits. Electric washers cost $150–$350 and work well for homeowners who pressure wash once or twice annually.
Gas-powered units (2,000–3,200 PSI) deliver higher pressure and flow, making them faster for large homes or heavily soiled surfaces. They require more maintenance, oil changes, spark plug replacement, winterization, but don’t tether the operator to an outlet. Gas models cost $300–$700 and make sense for homeowners with multi-story homes, long driveways, or frequent cleaning needs.
Both types accept interchangeable nozzles, color-coded by spray angle: 0° (red) for spot cleaning, 15° (yellow) for stripping paint, 25° (green) for general cleaning, 40° (white) for windows and vehicles, and soap nozzle (black) for applying detergent. Most exterior house pressure washing uses the 25° nozzle, switching to 40° near windows and trim.
Step-by-Step Guide to Pressure Washing Your House
Proper technique prevents damage and ensures even cleaning. Follow this sequence:
1. Prep the work area. Close all windows and lock exterior doors. Cover outdoor electrical outlets, light fixtures, and HVAC vents with plastic sheeting and painter’s tape. Move planters, patio furniture, and grills at least 10 feet from the house. Wet down foundation plantings with a garden hose, saturated soil prevents roots from absorbing detergent runoff.
2. Apply detergent. Use the low-pressure soap nozzle (black) and apply house wash detergent from bottom to top in 5-foot sections. Purpose-made detergents for pressure washers contain surfactants that break down organic growth without damaging plants. Let the solution dwell for 5–10 minutes, but don’t allow it to dry on the surface.
3. Rinse from top to bottom. Switch to the 25° nozzle and rinse starting at the roofline, working downward. Hold the wand 12–18 inches from the siding at a slight downward angle to prevent water from forcing behind panels. Overlap each pass by 50% to avoid streaking. On two-story homes, use an extension wand rather than a ladder, pressure washers create significant recoil, making ladders unstable.
4. Check for missed spots. Walk the perimeter while surfaces are still wet. Shadows and algae stains show up clearly on damp siding. Touch up problem areas immediately rather than waiting for the surface to dry.
5. Clean up and inspect. Flush the pressure washer with clean water for 2–3 minutes to clear detergent from internal components. Disconnect hoses and drain the pump to prevent freeze damage if storing in unheated spaces. Inspect siding seams and trim joints for gaps or cracks that may have been revealed during cleaning, small repairs now prevent water intrusion later.
Safety gear: Wear impact-resistant safety goggles, rubber boots, and hearing protection (gas models produce 85+ decibels). The spray stream can cut skin at close range, never point the wand at people, pets, or windows.
Common Mistakes to Avoid When Pressure Washing
Even experienced DIYers make these errors:
Using too much pressure. Vinyl and aluminum siding can dent, crack, or blow off J-channels when hit with 0° or 15° nozzles at close range. Start with the 40° nozzle and step down to 25° only if needed. Increase pressure gradually rather than starting at maximum.
Angling water upward. Spraying upward under siding laps forces water behind panels, leading to interior moisture damage and mold growth in wall cavities. Always angle the wand downward, even when cleaning second-story sections from a ladder or extension wand.
Ignoring weather conditions. Pressure washing in direct sunlight causes detergent to dry before it can work, leaving streaks and residue. Ideal conditions are overcast skies with temperatures between 50°F and 80°F. Avoid windy days, overspray carries detergent onto vehicles and windows dozens of feet away.
Skipping surface-specific techniques. Wood siding requires lower pressure (1,200–1,500 PSI) and a wider spray angle to prevent grain raising and splintering. Brick and concrete handle higher settings but need longer dwell times for detergent to dissolve efflorescence (white mineral deposits). Stucco and EIFS demand soft washing techniques to avoid pitting and delamination.
Neglecting surrounding surfaces. Runoff kills grass and shrubs if detergent concentrations are too high. Pre-wetting plants and rinsing thoroughly afterward minimizes damage. Covering foundation plantings with plastic sheeting offers better protection for sensitive species like azaleas and hostas.
Maintaining consistent distance and overlap prevents the “tiger striping” effect, alternating clean and dirty bands caused by uneven coverage. Many homeowners consult seasonal maintenance guides to time pressure washing with other exterior projects like gutter cleaning and window caulking.
DIY vs. Hiring a Professional: Which Is Right for You?
Most single-story homes under 2,500 square feet are straightforward DIY projects. A homeowner with a consumer-grade pressure washer can clean the exterior in 3–5 hours, including prep and cleanup. Total costs run $50–$100 for detergent and supplies if the equipment is already owned, or $200–$400 if renting a pressure washer for the weekend.
Hiring professionals makes sense in these situations:
Two-story or taller homes. Working from extension ladders with a pressure washer is dangerous and slow. Pros use scaffolding or lift equipment to reach upper stories safely and efficiently.
Delicate or specialized siding. Cedar shakes, historic brick, and EIFS require specific pressure settings and cleaning solutions. Incorrect technique causes permanent damage that costs thousands to repair. Professionals carry liability insurance covering such mistakes.
Heavy biological growth or staining. Thick algae mats, artillery fungus (tar-like black spots), and rust stains need commercial-grade detergents and multiple treatment cycles. DIY products often can’t match industrial cleaning agents.
Time constraints. Professionals clean an average home in 2–4 hours versus a full day for most DIYers. For homeowners prepping for a sale or event, the time savings justify the expense.
Professional services typically charge $0.08–$0.35 per square foot depending on siding material, regional labor rates, and accessibility. Platforms like HomeAdvisor connect homeowners with local contractors and provide project cost estimates based on zip code and home specifications.
For routine annual cleaning of standard vinyl or aluminum siding on a single-story home, DIY saves money without compromising results. Homeowners tackling the job for the first time should rent equipment before purchasing, real-world experience clarifies whether the task is worth repeating or better left to professionals going forward.